about me

My 10 words are Maximizer, Significance, Strategic, Command, Competition, Artistic, Creative, Stubborn, Preparation, Intelligent.


Pages

Monday, December 19, 2016

Semester 1 Overview

Multiplan Animation

This was one of my first animations that we got to create what we wanted and it wasn't dictated to us what needed to be made, we got to decided the theme for how it would look and also how fast it moved. I really liked this project because I learned a lot about how the length of something can affect the speed. I also learned a lot about how photoshop works and can be used to create backgrounds or characters for an animation. I think my greatest strength in this animation is that the sky looks really good and also the movement is good but I think that the level of detail in the front to the back looks off and gives the overall animation a tacky feel. I have improved this in my later works by adding more detail in the middle layers to make the change in detail more subtle from front to back. I can use what I learned from this project to create better backgrounds and scenes for my other animations and also be able to show movement more easily. This pick this project as one of my 5 favorite because of the overall look and the large amount learned through doing this project, it really helped my technical skills.


Story Animation

My story animation was my first animation where everything about it was up to me all it had to do was tell a story and show off the skill I had learned throughout my first quarter of animation. This project really helped me with my time management because I original wanted to do way to much for the amount of time given and I had to manage my time well to get everything done. I learned about how you can import After Affects files into other After Affects projects and also how to use compositions to create scenes within an animation. This project also helped me learn a lot about the different paint brush tools within Photoshop and how they can be used to create different looks. I picked this project because it is my best and also largest project made using After Affects. My greatest strength in this project was my characters because I drew them on paper and then imported them into the project and I think they look very good and also go well with the overall style. The one thing I didn't think went very well in this project was a couple of the scenes went too slow or the affect I wanted didn't really happen due to time restrains. I have improved because of this project in many ways such as my technical skills got better because I was brining together a lot of different things I had learned and making one large project.  I can expand off what I have learned through this project especially my project management and apply it to all my other projects, by having a plan on how and when things should be done it will help keep me on track and make sure I get things done. If I could change anything in the project it would be putting a little more time into it to smooth out the rough edges here and there and overall make it flow smoother.


Castle

My castle project was my first project done in Maya and was the start of my knowledge of 3D modeling, this is one of the main reasons I picked it because it will help show my progression and also shows the baseline for my modeling skills. I learned a ton from this project not only did I learn the basics on how maya works but also what makes a good texture and how to import one into your projects. I learned that the matter of selection matters greatly and also that using perspective view is great for looking at the overall project but not for moving things into position. This project included a lot of trial and error and undo was used greatly as mistakes were made while getting used to the program. My greatest strength in this project was my ability to move past the instruction and add my own things using what we had learned such as the moat. I really struggled with applying a stone texture to the castle and had a lot of trouble making it look right but eventually was bale to get it and now know how to do that. I used what I learned form this project win all of my other Maya projects because the basics are still used no matter how complicated the model you are creating is. gn

Hammer Pen

 This project really helped me learn how the extrude tool can be used to take a very basic shape and make it into something completely different and also how basic shapes really make up everything you just need to tweak them a bit. I picked this project because the extrude tool is one of the most important tools in Maya that we have learned and also this project was difficult and helped me learn that sometimes having patience and not trying to rush through something can help it look a lot better at the end. My greatest strength in this project is that my final product looks how it was supposed to and I am very happy with it. The main weakness in this project and also what I would change is that the handle was set up wrong leading to it not beveling right therefore I couldn't make it look more rounded. The things I learned in this project will help me with any other Maya project that includes the extrude tool because  this project gave me a much better understanding of how that tool works. 


Pen 

This project has ben picked because it is the project I am most proud of from the entire semester. The overall finished product turned out better than I thought it would and really looks like what I wanted it too. I learned a lot form this project because we got almost no instruction and had to figure out how to model most f the pen by ourself. This let me learn that by looking for the basic shapes in something you can effectively model it. The greatest strength go the project is that it looks like a pen and that There is a lot of detail and time put into it. The greatest weakness of this project would be the clip on the top of the pen . This is the one part of the pen that I thought could be better and could be changed because it does not look quiet like I wanted it to. This project really shows who I have improved from my first model (the castle ) and how all the tools can come together to crete one project. I can use what I have learned from this project next time we had to create something without much instruction because I will know that breaking it sown into shapes will really help me.              

Thursday, December 15, 2016

Professianal Project Review

The Project

The project I looked at is the trailer to the upcoming animated movie The Boss Baby. The trailer shows a quick overview of the main plot of the movie and also of a couple of the major characters that will be in the movie. The trailer introduces the Templetons and their son Tim who suddenly has a new baby brother who wears a suit and carries a briefcase. The new sibling puts the house in chaos and Tim suspects something is going on eventually finding out that this baby brother can talk and is almost like n adult in a babies body.

Analysis

This trailer uses many principals of animation well such as there is a very good use of squash and stretch since the characters are created in a more cartoony style their movements especially talking can have exaggerated movement. The trailer included a slow motion part where someone is talking and it showcases the way the cheeks and mouth move in a squash and stretch style. the trailer also has a story line and covers the major points of a story making it enjoyable to watch. Ease in and out is also used especially when the baby throws a crayon or plate. There is a pretty good use of most of the principals of animation the only thing that is a little of is some things such as the proportions and movements but part of that is the animation style.

How Can I Use This

The major thing I have gotten out of this trailer that I could use in my work is how much the little details matter. The facial movement and all the decoration in the background really help to tell the story and really add a lot to the final work. Taking time on the small thing really helps the overall animation and can be a great way to make your animation stand out.

Strengths and weaknesses

The creator did a really good job with the settings and all the small details, they also did great with telling a complete story even though the trailer is only 1:45 Min. they could improve on the characters a little bit maybe explaining a little more about the parents or what it was like before the addition of the baby brother.


Professional Article review

Drawing and Animation 

While looking through options for articles to read about animation an article about how drawing relates to animation caught my eye, This article made the simple point that to be a good animated you must start simply with drawing and understanding how to draw. The other large point in the article was you do not by any means have to be amazing at drawing or be a crazy good artist you just must understand specific drawing principles that will apply to your animation. Finally the article made the point that through practicing and the right drawing exercises you can learn how to observe the world around you for the details and not just what you think something is and training your brain toes this way helps you with both drawing and animation.

Authors Argument 

The authors argument is that for any animation job or animation related job you must know how to draw and that the biggest problem artists have is not technique or inspiration but lack of seeing.  

Lack of Seeing 

To support the second half of this argument the author supports this by claiming the left side of our brain filters out things we see making stuff simpler such as when you walk down the street you don't notice most of the details but notice thing for what you think they are. When you see a person you don't notice specifics and you think of them in a general term like a head is a oval and a leg is 2 lines with a slight bend. The author then goes on to show simple exercise in learning how to draw movement and contour and learn how to draw human figure.

Strengths and weaknesses


The author does a great job at explaining what each exercise is for and exactly how to do it. great detail is given on how to perform tasks and why it will help you but there is an overall lack of quotes and expert advice. Most of the article is just to authors view it would add a lot if they used sorces or people that are professionals to explain. If the author would also state what profession they hav that may relate to animation that would also help with reliability.

My Take

I think the article is overall very helpful and informative. The author backs their points up with lots of explanations and shows why thing help. The main point of the article I think is very significant because animation is very similar to drawing you just then move the drawings and also many of the skills used in drawing also can apply to animation. I may try some of the things mentioned in the article to improve my animations and or drawing skills so that in the future my animation characters will look more realistic.


Find the article here for reference


Tuesday, December 13, 2016

How to Create a Bookcase

What, Why, and Who
This post will be about how to create a bookcase in Maya 3D modeling. This skill could be useful when you need a quick way to add a little extra detail to your Maya scene. This tutorial allows beginners to Maya or anyone looking for a quick way to add that little something extra to their scene to have a easy way to add a decorative piece that is functional and easily can change to fit their needs.

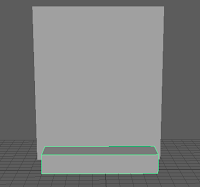
1st: Create a large rectangle and name it bookcase, this should be the size you want your final bookcase to be.

2nd:create another rectangle and name it shelf, this will be the size of the space that will be cut out to create a shelf.

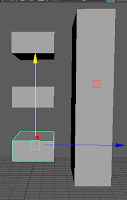
3rd: Duplicate the shelf 2 times (command D) and move the copies up so that they line up with where you want your 3 shelves to be on the bookcase.

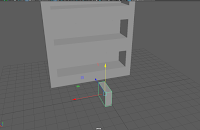
4th: Next move the shelves so that they are in the bookcase and taking up the room you want them to cut out.

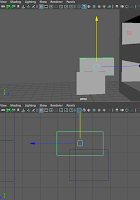
5th To create the books to go on the shelves first create a rectangle about the dimensions you want, this is easier if you do it close to the book case so you can see if your height will line up.

6th: Then duplicate the book and scale the copy down a bit so you can place it on top and cut out a space to make a more realistic cover look. (Shown left)

7th: Adjust the book to your liking then duplicate it 3 times creating 4 books. Use Lambert to add a color to the books making each a different color.

8th: Use the face select mode to chose just the top face of the book where it is indented and make it the color of pages of a book.

Then add a brown Lambert to the bookcase

9th: Now that you have your 4 types of books make lots of copies of each and start lining them up on the shelves of the bookcase.

The final product should like look the picture to the left and if it does then congrats you have a great bookcase to add to one of your models.


Friday, November 11, 2016

Story Animation

Main Point

The main scope of this project was for us to learn how to put many animation skills together into a complete story with a beginning middle and end. We had to use the animation techniques that we had been learning throughout the quarter and find a way to put them all together. This was also my first larger animation so I was also learning project management and how to use time effectively and find ways to make things more simple.


 Process
This project had a very long process including preparation work and creation of backgrounds/ characters, then animation work trying to bring it all together and even editing after the final was done and feedback had been received to try and make the animation better. The time spent one these areas was very large but overall was worth it and the result of the project was worth all the work.


Pre Creation 

The first step was to brainstorm for ideas I could use on the project such as the tank escape or maybe a robot destroying a city, most of these ideas got scratched early on and he final idea for a tiki getting captured and then escaping was picked. Then I created a plan for my animation including a story line pyramid and story boards. After that I tried to figure out what would be the easiest was to create the many scenes and how I could reuse backgrounds to make the project a little easier. Then I drew my main characters and used a scan to put them into the computer.

Creation

Once on the computer the first thing I did was take the original character scans and use the paint bucket tool to color them in and then use the paintbrush tool to give them ams and legs. Next I started to create the backgrounds for my story which took a lot of time due to the fact that my story took place in a rainforest and there is a lot of detail that I had to put into making the trees and vines look right. This was defiantly the most time consuming part of creating everything for the animation but did turn out looking how I wanted it. Then I went back through h and created the other prop type objects I would need and fixed or fine tuned anything I found that looked off when I was double checking.


Animation

At this stage I was ready to combine everything into one final animation but it would not be as easy as I thought. To create a story with multiple scenes in Adobe Premier you are required to create multiple compositions and add them all together into a final composition. The individual compositions each gad to be made as if I working on operate projects and they took up large amounts of time trying to figure out how I could make things look the way I wanted

Change

If I were to redo parts of the project I would use the critics I got from my class to help me know what would be best to change. The first thing I would change would be to make some of the walk cycles more smooth and keep the feet from slipping as much. I would also take more time on making the trees that are further back look more faded and have less detail so that it looks more like they are far away. Another thing that could be better is I could connect the scene where the tiki falls in the hole and the next scene where he's in a cage better so that it makes more sense.

Favorite

My favorite part of my animation is the overall art works and how all of it looks like its the same style and that it all looks like it goes together, I think this is a very important part of an animation so that it looks like one complete animation not a bunch of things thrown together. I also like my tiki characters and think they are well done and help add a lot to the story.

                                   Takeaway 


The biggest take away for me from this project would be project management because this being our first larger scale project and I had a lot of things to get done for my animation Sometimes it was hard to find time for everything. I found that keeping your files organized and knowing what you want to have done by certain times is very helpful in keeping things running smoothly and making sure the project ends up done on time.

Conclusion

In conclusion this project was a lot of fun and taught me a lot about how to manage my time and eep things on track but didn't come with its struggles. The project has helped prepare me for other large projects in the future and proved to be a very valuable experience. although there are things that could be worked on more I am overall very pleased with the results of my project and am very glad I put the time into it that I did so that I could make it who I wanted.